17
2015
Managing invoices in the Online Invoices system
Through the “Invoice & Estimates” tab, Select “Manage Invoices”. If you have activated the “Inventory management and control software” using the “Plug-in Manager” section, then the “Invoice & Estimates” tab will be showing as “Sales”.
The invoices page lists all invoices issued by the system, whether manually or through the automated functions for subscription renewals. You can search by Client (or use the advanced selectional options through the More Options link at the top right corner). The invoices can be categorized and listed by date, status etc. simply by clicking on the horizontal row that contains the existing invoices, Invoices can be edited, exported, printed, and saved as a “PDF” file, Any invoice emailed to the client will include any attachments added to the invoice when it was originally created (unless it has been edited or updated later on).
- Use the “Search” feature to locate the invoice and save a plenty of time.
View an invoice and modify it
- Through the “Invoices & Estimates” tab, Select “Manage Invoices”. If you have activated the “Inventory management and control software” from the “Plug-in Manager” section, then the “Invoice & Estimates” tab will be “Sales”.
- Locate the invoice using the “Search” bar.
- Click on the “Invoice” you wish to review.

- The invoice page will show you a preview of the invoice and it’s status, whether it has been
paid, partially paid, unpaid or even saved as a draft. - “Email to Client”,” Edit”, “Delete” ,“Print”, Save the invoice as a “PDF”, “Clone”, “Mark as Draft” or “Add Payment”.
View and add payment to an invoice
- Through the “Invoice & Estimates/Sales” tab, Select “Manage Invoices”.
- Find the invoice using the “Search” bar.
- Click on the “Invoice” you wish to view or “Add Payment” to.
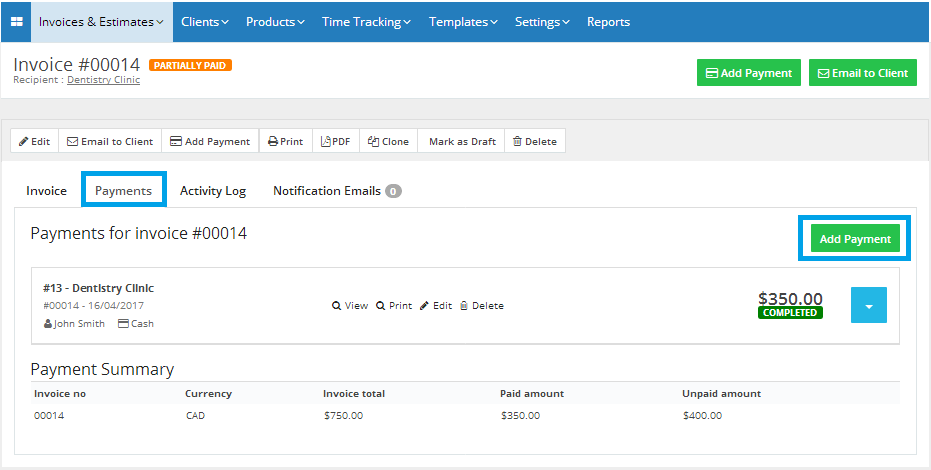
- Click on the “Payments” tab.
A list of payments associated with the invoice will be showing, Click “View” to see the payment details.
You can manually add a payment by clicking the button “Add Payment”.
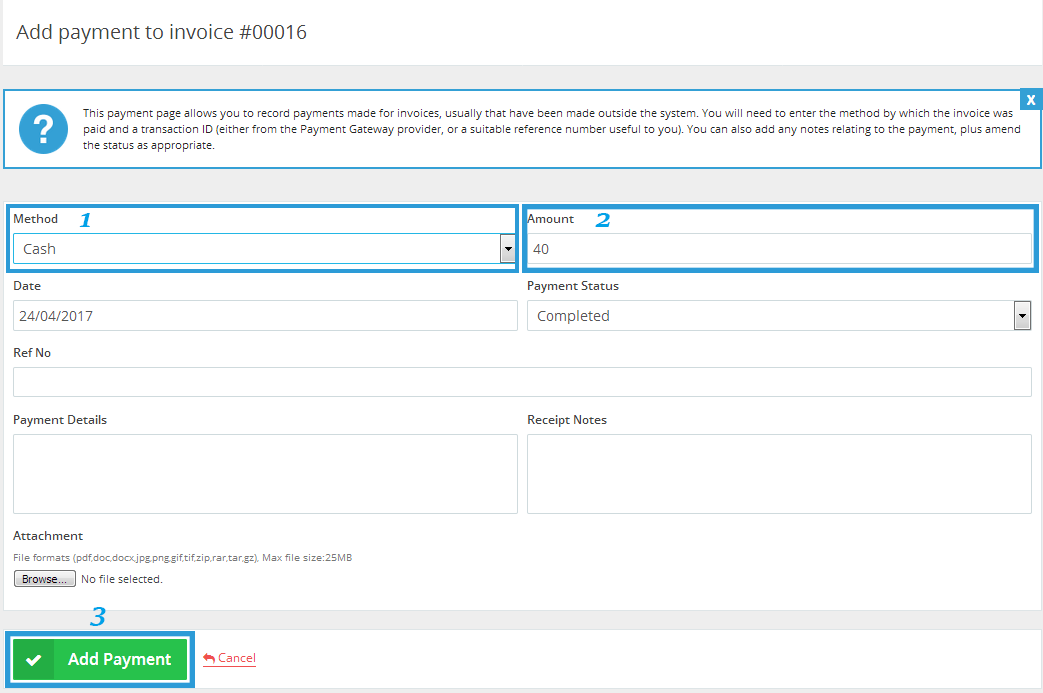
After you click on the green “Add Payment” button, You will be directed to the following page below that will allow you to select your payment “Method” and add the “Amount” of your transaction, then click on the green “Add Payment” button at the bottom of the page to the left so you can make a payment.
Please note that: In case if you have not added the whole amount of your invoice, thus the system will consider this transaction that occurred as a partially paid installment and will also convert your invoice status to “Partially Paid”
The customer will still be required to pay the remaining balance of the total amount.
View email history of a certain invoice
- Through the “Invoice & Estimates/Sales” tab, Select “Manage Invoices”.
- Locate the invoice using the “Search” bar.
- Click on the “Invoice” to review its content.
- Click on the tab “Notification Emails”.
- You will be able to view a list of emails sent to the client. You can view the details of the email along with the sent date. And also you can send the invoice by email by clicking the “Email to Client” button.

Delete an invoice with its related data
- Through the “Invoice & Estimates/Sales” tab, Select “Manage Invoices”.
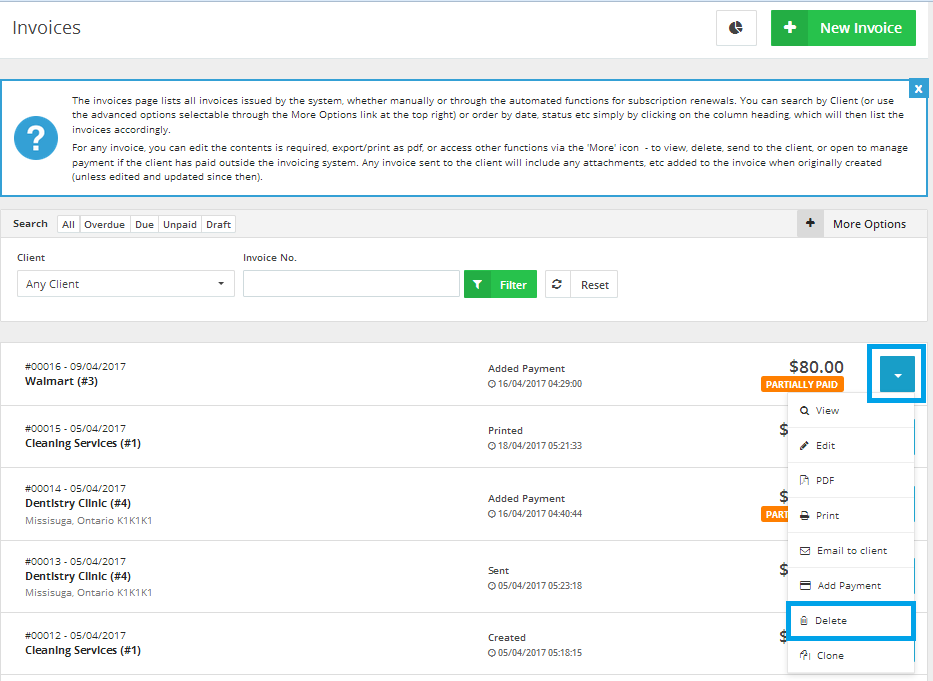
- Click on the marked Blue button at the right-hand side in which will populate a menu of actions then select the “Delete” option to delete your invoice as showing in the following figure.
You will be seeing this confirmation message that will populate when you select the “Delete” option so click the “Yes” button to confirm deleting the invoice.
Archives
- October 2022
- June 2022
- May 2022
- April 2022
- February 2017
- November 2016
- October 2016
- July 2016
- June 2016
- April 2016
- March 2016
- February 2016
- January 2016
- December 2015
- November 2015
- October 2015
- July 2015
- June 2015
- May 2015
- April 2015
- March 2014
- October 2013
- August 2013
- June 2013
- May 2013
- January 2013
- December 2012


