Jun
19
2016
19
2016
Manage Purchase Orders on “Online Invoices” Inventory system
Through the “Inventory” tab, select the “Manage Purchase Orders” option.
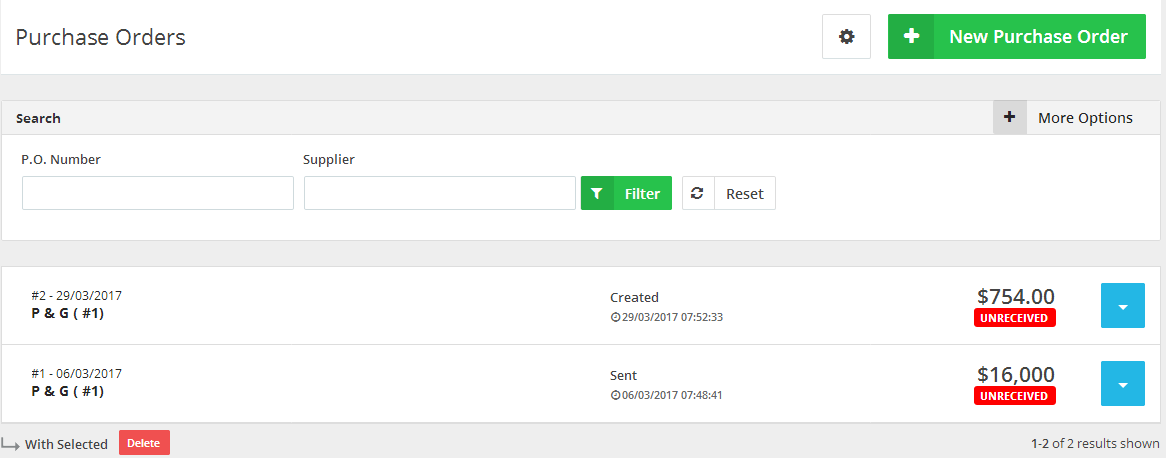
- The Purchase Orders page displays all the “Purchase Orders” you have already created.
- To create a new “Purchase Order”, click the “New Purchase Orders” button.
- Use the “Search” bar to search for “Purchase Orders” by “Number”, “Supplier”, “Currency”, “Date” and “Staff”.
Each displayed “Purchase Order” will show its “Number”, “Supplier Information”, “Date”, “Status” (“DRAFT” – “UNRECEIVED” – “RECEIVED”), and “Price”.
Edit a “Purchase Order”.
- Through the “Inventory” tab, select the “Manage Purchase Orders” option.
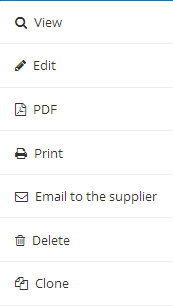
- Next, to the “Purchase Order” you wish to edit, on the same horizontal row click the “Blue” button at the right-hand side and select the “Edit” option.

Delete a “Purchase Order”
- Through the “Inventory” tab, select the “Manage Purchase Orders” option,
- Next to the “Purchase Order”, you wish to delete, on the same horizontal row click the “Blue” button and select the “Delete” option.
Save a “Purchase Order” as a PDF file
- Through the “Inventory” tab, select the “Manage Purchase Orders” option.
- Next to the “Purchase Order”, you wish to download as PDF, on the same horizontal row click the “Blue” button and select the “PDF” option.
- The “PDF” file will start downloading automatically.
Print a “Purchase Order”
- Through the “Inventory” tab, select the “Manage Purchase Orders” option.
- Next to the “Purchase Order”, you wish to print, on the same horizontal row click the “Blue” button and select the “print” option.
Email a “Purchase Order” to the supplier
- Through the “Inventory” tab, select the “Manage Purchase Orders” option.
- Next to the “Purchase Order” you wish to email, on the same horizontal row click the “Blue” button “Email to supplier”.
- Edit the email body and information and then click “Send”.
Clone a “Purchase Order”
- Through the “Inventory” tab, select the “Manage Purchase Orders” option.
- Next to the “Purchase Order”, you wish to clone, on the same horizontal row click the “Blue” button and select the “Clone” option.
- The Purchase order will be cloned and opened in a new window to complete its data.
Viewing a “Purchase Order” information
- Through the “Inventory” tab, select the “Manage Purchase Orders” option.
- Next to the “Purchase Order”, you wish to view, on the same horizontal row click the “Blue” button and select the “View” option.

- Click the “Purchase Order” tab.
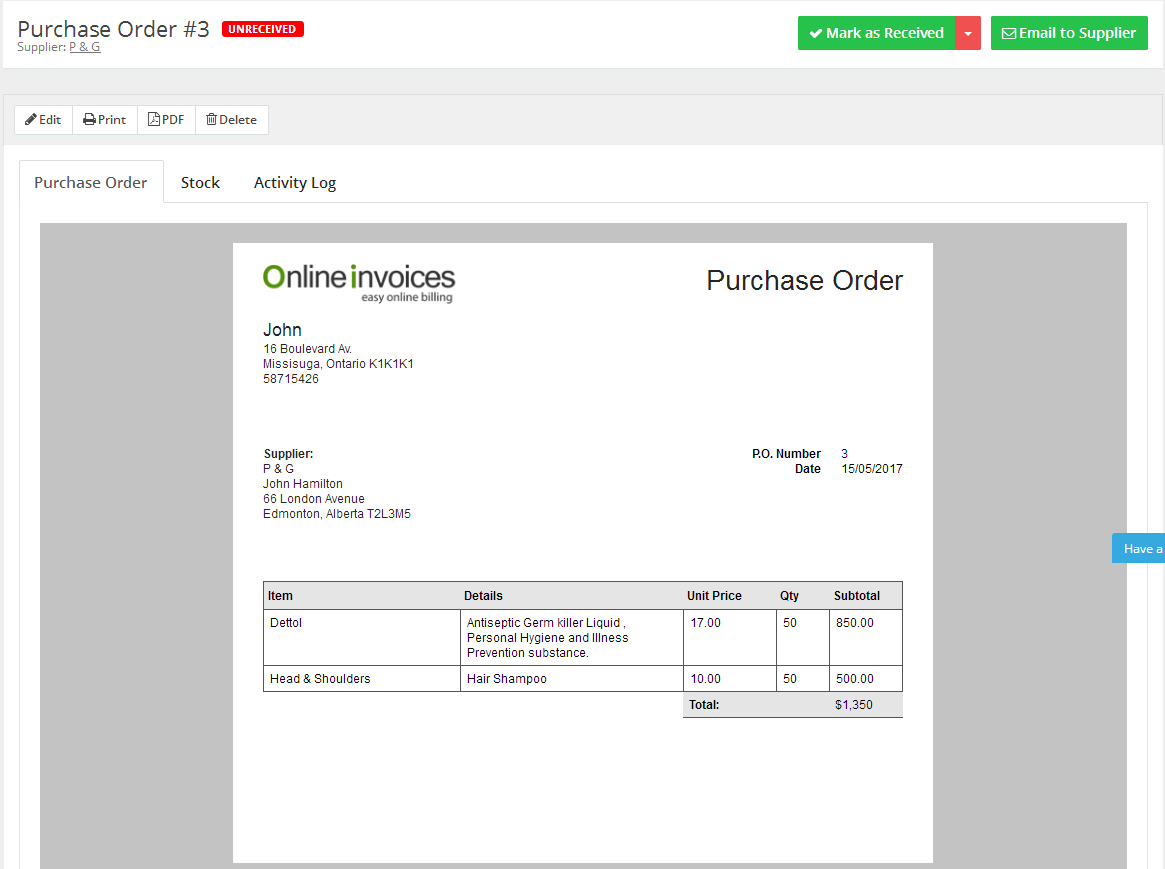
The “Purchase Order” tab will show the “Purchase Order” details and actions to apply (“Edit” -“Email” – “Print” – “PDF” – “Delete”) and “Mark as Received”.
Mark a Purchase Order as Received
- Through the “Inventory” tab, select the “Manage Purchase Orders” option.
- Next, to the “Purchase Order” you wish to view, on the same horizontal row click the “Blue” button and select the “view” option.
- Click the “Purchase Order” tab.
- At the top right corner, click the “Mark as Received” button.
Mark a Purchase Order as Unreceived
- Through the “Inventory” tab, select the “Manage Purchase Orders” option.
- Next, to the “Purchase Order” you wish to view, on the same horizontal row click the “Blue” button and select the“View” option.
- Click the “Purchase Order” tab.
- At the top right corner, click on the red marked arrow and click the “Mark as Unreceived” button.
View the Activity Log of a purchase order.
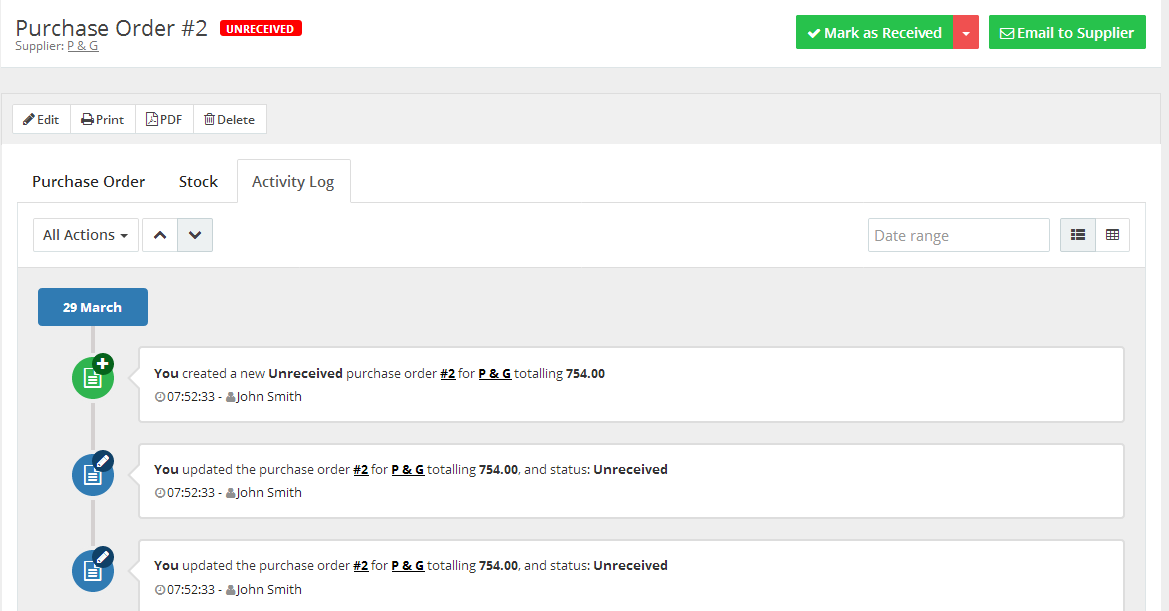
All actions done on a certain “Purchase Order” are recorded internally on your system. To view the latest activities: please follow the following steps.
- Through the “Inventory” tab, select the “Manage Purchase Orders” option.
- Next to the “Purchase Order”, you wish to view, on the same horizontal row click the “Blue” button and select the “View” option.
- Click the “Activity Log” tab.
The “Activity Log” tab will show all the latest actions done concerning to the purchase orders and which staff members performed those actions.
View the Sent Emails for a purchase order.
- Through the “Inventory” tab, select the “Manage Purchase Orders” option.
- Next to the “Purchase Order”, you wish to view, on the same horizontal row click the “Blue” button and select the “View” option.
- Click the “Notification Emails” tab.
Change the Purchase Order Settings
To change the next “P.O Number” or the “Shipping & Billing Information”:
- Through the “Inventory” tab, select the “Manage Purchase Orders” option.
- At the top right corner, click on the marked in blue “Gear icon” button as showing in the below figure.

- In the “Next P.O. Number” text box, add the number you want the system to start counting from.
- Through the “Shipping & Billing information” drop-down menu, select whether you want the system to use your default address or add a custom address.

Archives
- October 2022
- June 2022
- May 2022
- April 2022
- February 2017
- November 2016
- October 2016
- July 2016
- June 2016
- April 2016
- March 2016
- February 2016
- January 2016
- December 2015
- November 2015
- October 2015
- July 2015
- June 2015
- May 2015
- April 2015
- March 2014
- October 2013
- August 2013
- June 2013
- May 2013
- January 2013
- December 2012


