Feb
3
2016
3
2016
How to import a list of products from a CSV file
You can add a numerous number of products in a few steps without having to enter every product one by one manually to the system by using the importing feature. You can import the “Product Code”,”Bar Code”,”Name”, “Description”, “Unit Price”, “Buy Price”, “Default Quantity”, “Category” and “Brand” fields.
To start importing any lists of products you will have to do the following steps:
Notes:
- Only CSV files / Text files (Comma Separated, Tab Delimited, Column separated can be imported).
- If you have any other file type you can access it using an intermediate application, such as “Microsoft Excel” and save it as “CSV” and then import it into the system.
- You can use the import feature to quickly add your data in a spreadsheet and import it into the system, And here we explain how to import the data using Microsoft Excel software.
- Open the Excel program
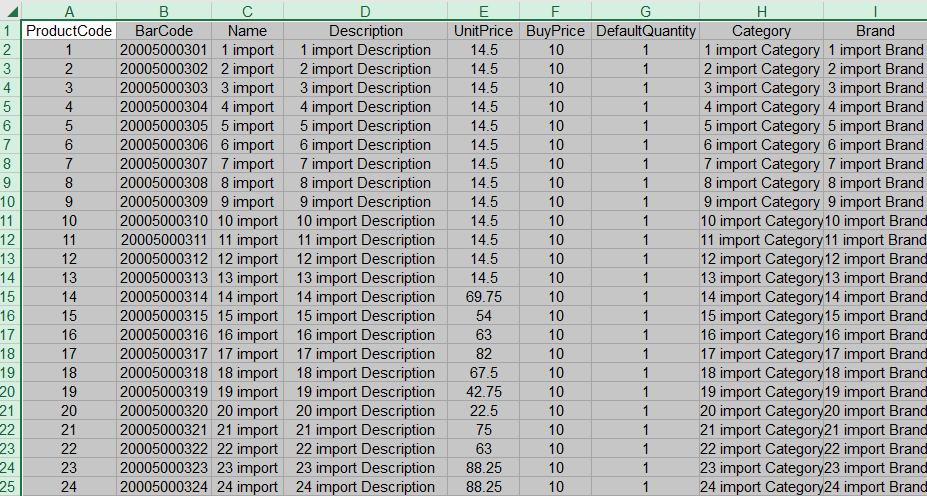
- At the beginning of the first row add the fields “Product Code” ,”Bar Code” ,”Name”, “Description”, “Unit Price”, “Buy Price”, “Default Quantity”, “Category”, “Brand” in the A1, B1, C1, D1, E1, F1, G1, H1 and I1 fields in the same ascending horizontal order.
- Beneath every field fill out all the products details as showing in the following figure
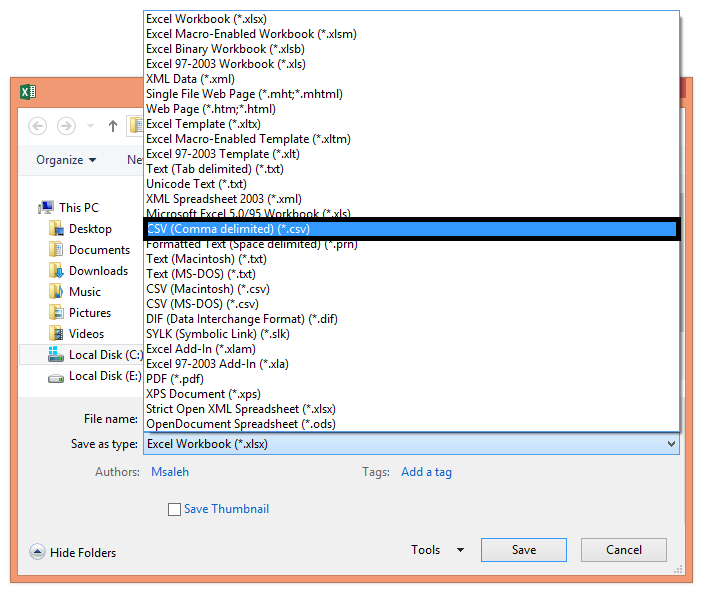
- After you finish adding all your items save the Excel file as CSV (”Comma delimited”).
- Log in to your online invoices account.
- Through the “Products” tab select the “Manage Products” option.
- Click the “Import” button at the top right corner on the left-hand side of the “New Product” button.
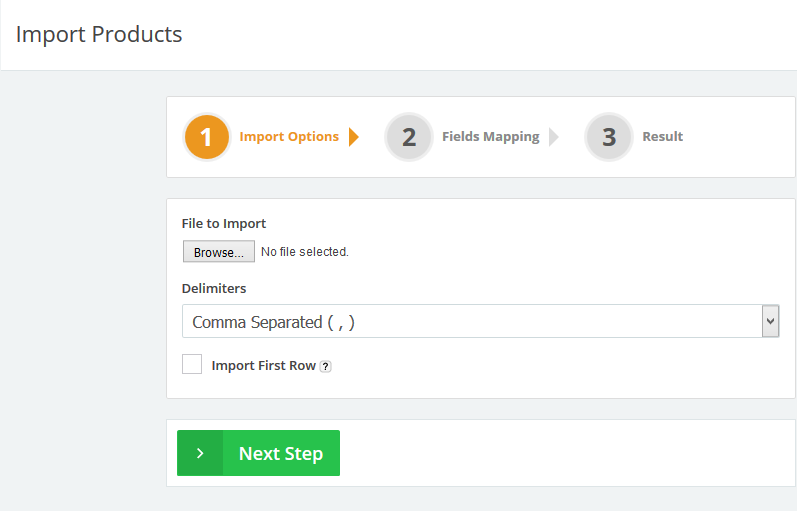
- The importing wizard will start

- Determine the file that will be imported (the CSV file we previously saved) by clicking on the “Browse” button.
- Through the Delimiters section, select the “Comma Separated” option.
- Click the “Import First Row” check box. If your file contains field labels showing in the first row so in this case, we will not tick the check box.
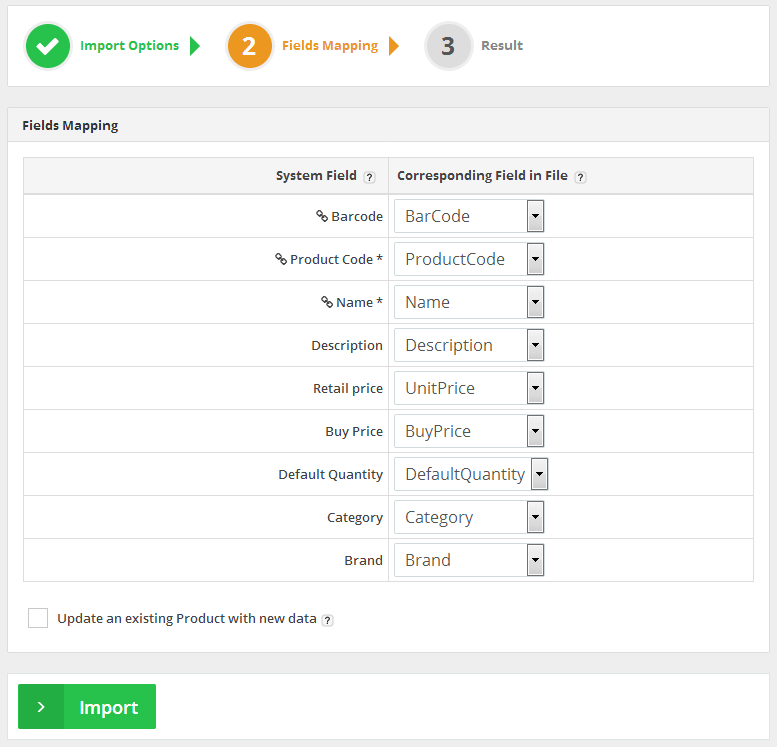
- The “System Field“ column: This column shows which fields on the system can the imported data be uploaded into; “*” meaning that this field must be filled (mandatory), and “Chain icon” means that this field is unique (i.e. if you have checked the “Updated an existing product with the new data” check box and there was an existing record that contains the same field value then it will update that existing record with the newly imported record. If you didn’t check the “Updated an existing product with the new data” check box and there was a record with the same existing data then it will ignore importing it and will be showing you errors regarding this record.
- The “Corresponding Field on File” column: Each drop-down menu on this column shows all the column headers on your file. Please select the equivalent column on your file for each system column (only system fields with “*” are required to have an equivalent selected field).
- In this case, we only added the new products and selected a corresponding field in the file for each system field as showing in the figure above, and the “Update an existing product with the new data” checkbox will not be checked as the process will be adding the new data only.
- Click the “Import” button.
Step 3 (Importing):
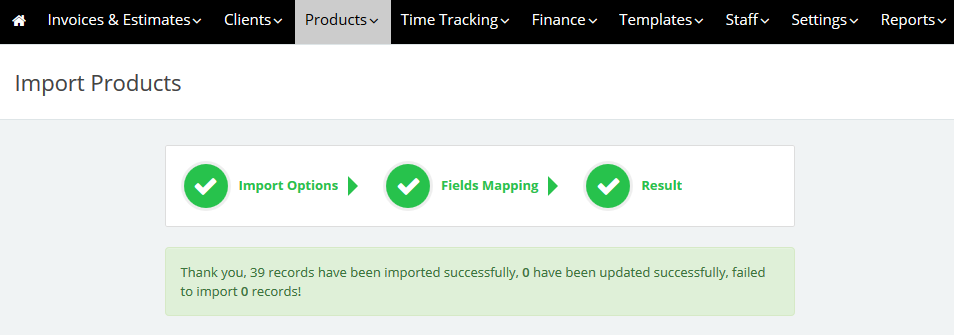
- The system will take a few seconds to import the fields and save them.
- Go back to the “Manage Products” page to check the imported products.
Archives
- October 2022
- June 2022
- May 2022
- April 2022
- February 2017
- November 2016
- October 2016
- July 2016
- June 2016
- April 2016
- March 2016
- February 2016
- January 2016
- December 2015
- November 2015
- October 2015
- July 2015
- June 2015
- May 2015
- April 2015
- March 2014
- October 2013
- August 2013
- June 2013
- May 2013
- January 2013
- December 2012

