Jan
24
2016
24
2016
Adding and Managing Incomes in OnlineInvoices
Adding your income on the OnlineInvoice Online billing and Accounting Software will help you to track your profit and loss, taxes and other accounting items related to your income.
Add new incomes to your online invoices system:
- Through the “Finance” tab, select the “Incomes” option.
- Click the “New Income” button.
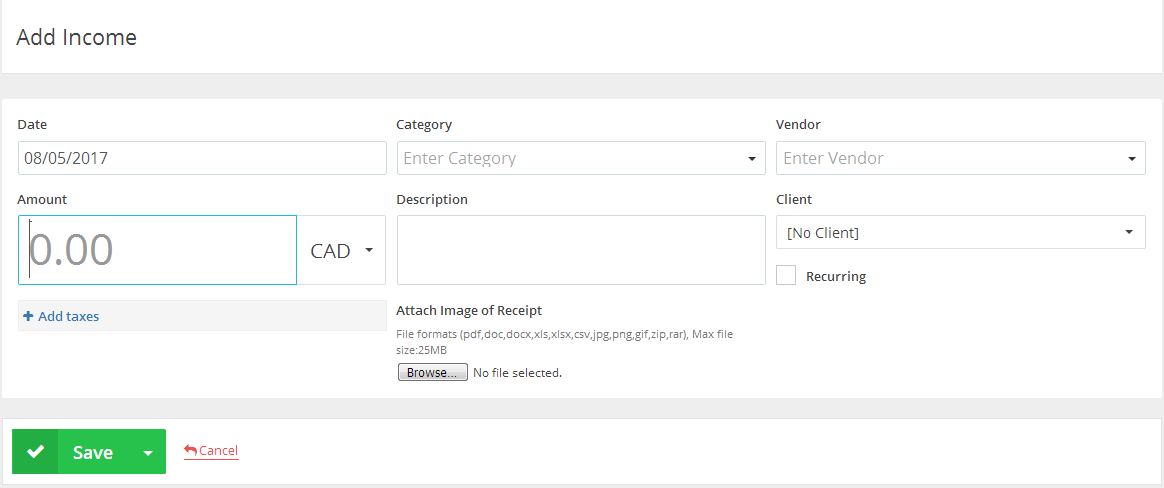
- Add the details of the income.
- Select a “Date” for the income you wish to add.
- Select a “Category” from the drop-down menu or insert the category manually – all inserted categories are saved once you click the “Save” button.
- Choose a “Vendor” from the drop down menu or insert the vendor manually – all inserted vendors are saved once you click the “Save” button.
- Add the “Amount” of the income and select the “Currency”.
- Add the taxes related to this income all those taxes are included in the income total. To create new taxes click Managing Tax Options for Online invoices.
- Add a “Description” of the income.

- “Attach Image of Receipt” or any related invoices to the income.
- Assign the income to your “Client”.
- Choose whether this Income is “Recurring”:
- Click “Save” to save the new income or click the “Save and Add New” button to save the income and open a window to add the new income.
Managing Your Income Entries:
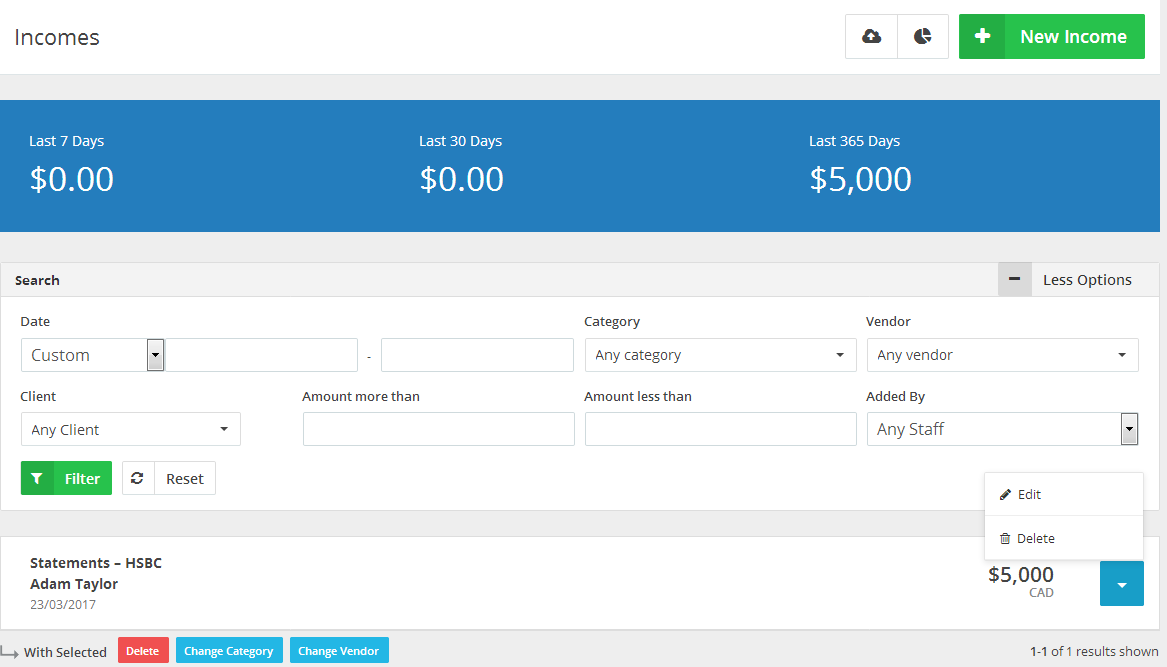
Through the “Finance” tab, select the “Incomes” option.
- To create a new income click the “New Income” button at the top right corner.
- The Blue Division bar displays your entered “Incomes” during the showing periods which are the: “Last 7 Days”, “Last 30 Days” and “Last 365 Days”
- To import the income entries click the upload button and follow the steps.
- Use the “Search” bar to search for “Incomes”.
- Use the “Date” section to search for incomes by date.
- Use the “Vendor” drop down menu to view only incomes for this vendor.
- Use the “Category” drop-down menu to view only incomes for this category.
- Use the “Client” drop down menu to view only incomes for this client.
- Use the “Amount more”/ “Amount less than” fields to show incomes in a certain range.
- Use the “Added By” drop down menu to show any incomes created by a certain staff member from your team.
Edit an Income:
- Through the “Finance” tab, Select the “Incomes” option.
- Click the marked “Blue” button at the right-hand side of the “Income” row then select the “Edit” option.
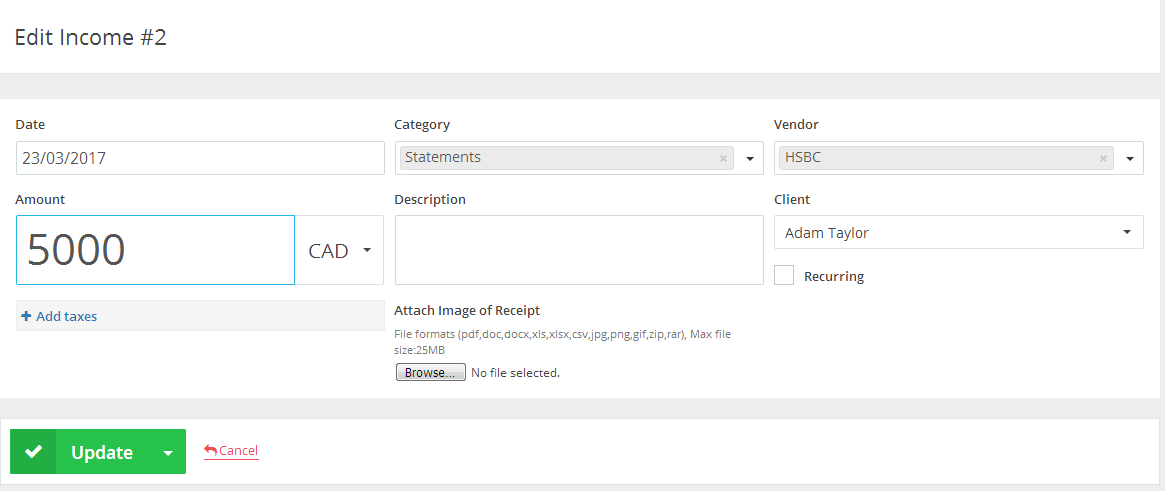
- Edit the details you need to edit.
- Once you are done editing, Click the “Update” button.
Deleting an “Income”:
- Through the “Finance” tab, select the “Incomes” option.
- Click the marked “Blue” button at the right-hand side of the “Income” row then select the “Delete” option.

- A confirmation message will populate so click the “Yes” button to confirm deletion or the “No” button to refer back to the “Incomes” page.
How to import a list of income entries from CSV file.
- Open the Excel program
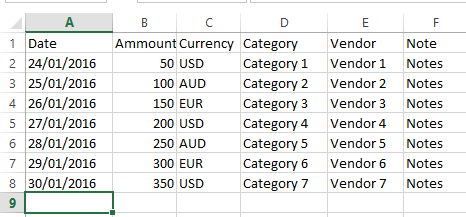
- At the first row add the “Date”, “Amount”, “Currency”, “Category”, “Vendor” and “Notes”.
- Beneath each field fill out all the details as in this figure showing below.
- The Date field must be formatted the same as your system’s date format; in this case, we can use the DD/MM/YYYY format.
- The “Currency” field must be added in the country’s “Currency” code, such as “USD”, “AUD”, etc.
- All the added categories “Category” and vendors “Vendor” are automatically saved.
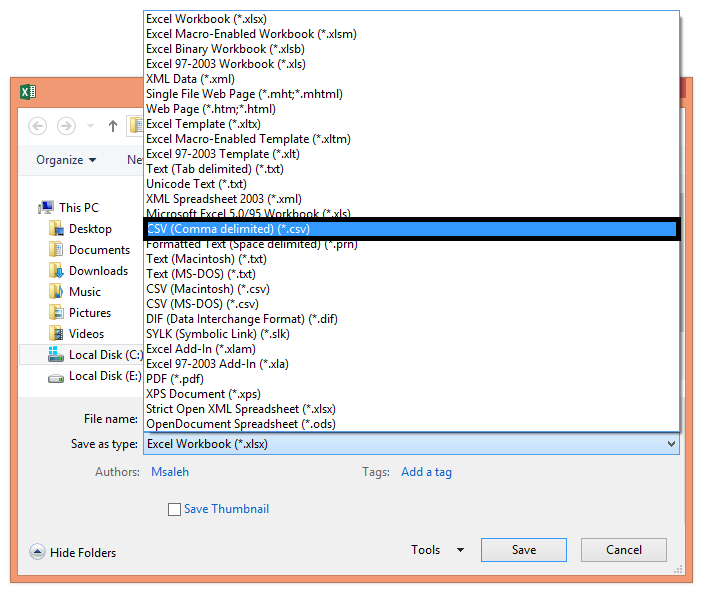
- After you have added all your items save the Excel file as CSV (“Comma delimited”).
- Log in to your online invoices account.
- Through the“Finance” tab, select the “Income” option.
Click the marked in blue “Import” button at the top right corner.
The importing wizard will start.
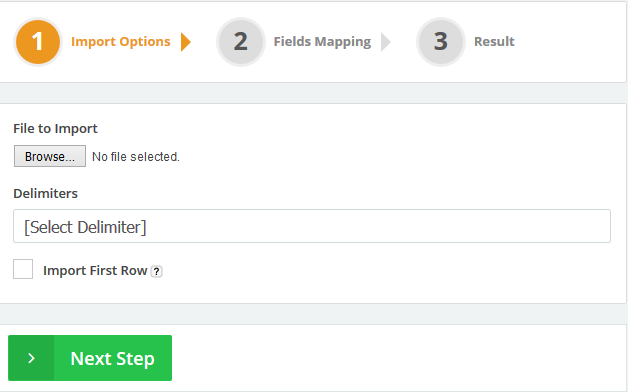
Step 1 Import Options:
- Select the file that will be imported (the CSV file we previously saved).
- Through the “Delimiters” section, select “Comma Separated”.
- Click the “Import First Row” check box. If your file contains the same existing field labels at the first row, So in this case, we will not tick the checkbox.
- Then click the “Next Step” button.
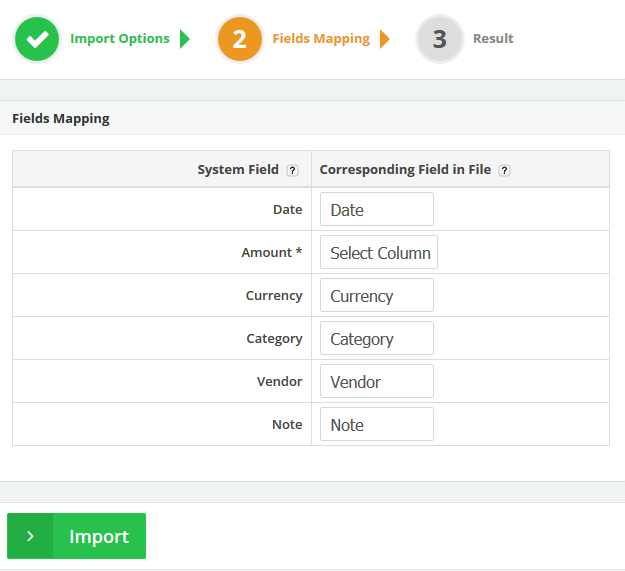
Step 2 Fields Mapping:
On this step, We will map the fields (Columns) on the imported file to the corresponding fields on the system.
- The “Amount” field is mandatory and must exist on the file.
- Select a corresponding field on the file for each system field as showing in the above figure.
- If you have entered a new “Category” or “Vendor” then it will be saved on the system.
- Click the “Import” button.
Step 3 Importing:
- The system will take a few seconds to import the fields and save them.
- Refer back to the “Incomes” page to check the imported “Incomes”.
Archives
- October 2022
- June 2022
- May 2022
- April 2022
- February 2017
- November 2016
- October 2016
- July 2016
- June 2016
- April 2016
- March 2016
- February 2016
- January 2016
- December 2015
- November 2015
- October 2015
- July 2015
- June 2015
- May 2015
- April 2015
- March 2014
- October 2013
- August 2013
- June 2013
- May 2013
- January 2013
- December 2012


